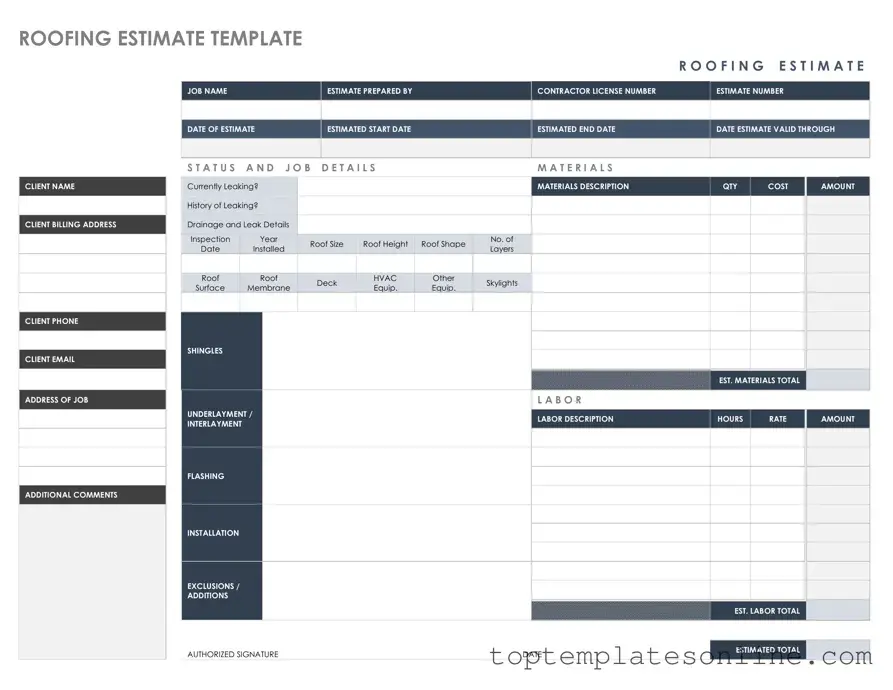
Fillable Roofing Estimate Form
When planning a roofing project, obtaining a detailed roofing estimate is crucial for homeowners and contractors alike. This essential document serves as a roadmap, outlining the scope of work, materials needed, and associated costs. A comprehensive roofing estimate form typically includes sections for project specifications, such as the type of roofing material, the size of the area to be covered, and any necessary repairs or upgrades. Additionally, it captures important details like labor costs, timelines for completion, and payment terms. By ensuring that all relevant information is clearly presented, the roofing estimate form helps to prevent misunderstandings and sets clear expectations between parties. Ultimately, a well-structured estimate can lead to a smoother project execution and greater satisfaction for everyone involved.
Common PDF Templates
How Long Does College Credits Last - Ensure all your details are accurate to avoid delays in your transcript processing.
Employer's Quarterly Federal Tax Return - Employers must report adjustments for any overpayments or underpayments on Form 941.
For those looking to establish a solid foundation for their business, understanding the role of an Operating Agreement is vital. This document is integral to defining the operational framework and can significantly benefit new LLC formations, making it important to familiarize yourself with the key aspects of the Operating Agreement for your New York LLC.
Renew My Passport Australia - Head size in the photo should be 32mm to 36mm for best results.
Common mistakes
-
Incomplete Contact Information: Failing to provide a full name, phone number, or email address can lead to delays in communication. Ensure all fields are filled out accurately.
-
Neglecting to Specify Roof Type: Different roofing materials and styles require different approaches. Clearly indicate whether the roof is flat, pitched, or has specific materials like shingles or tiles.
-
Omitting Measurements: Accurate measurements are essential for a precise estimate. Include dimensions of the roof and any additional structures that may need coverage.
-
Ignoring Existing Damage: If there are any visible damages, such as leaks or missing shingles, note these on the form. This information helps contractors assess the situation better.
-
Not Mentioning Special Features: Features like skylights, chimneys, or vents can affect the roofing process. Include details about these elements to ensure an accurate estimate.
-
Failure to State Budget Constraints: If there is a specific budget in mind, communicate this upfront. It helps contractors propose options that align with financial expectations.
-
Overlooking Timeline Expectations: Provide information about any deadlines or preferred start dates. This can help contractors prioritize their schedules and meet your needs.
Guide to Writing Roofing Estimate
After you have gathered all necessary information, you are ready to proceed with filling out the Roofing Estimate form. This form will help you document the details needed for your roofing project. Follow the steps below to ensure accurate completion.
- Begin by entering your personal information. This includes your full name, address, phone number, and email address.
- Next, provide the property details. Specify the type of property (residential or commercial) and the address where the roofing work will take place.
- In the roof specifications section, indicate the size of the roof in square feet and describe the current roof condition.
- List any specific materials you prefer for the roofing project, such as shingles, tiles, or metal.
- Include any additional services you may require, like gutter installation or roof inspection.
- Finally, review all entered information for accuracy before submitting the form.
Documents used along the form
When dealing with roofing projects, several forms and documents may accompany the Roofing Estimate form. Each of these documents serves a specific purpose, ensuring that all aspects of the project are clearly outlined and understood by all parties involved. Below is a list of commonly used documents that may be required.
- Contract Agreement: This document outlines the terms and conditions of the roofing project. It includes details such as the scope of work, payment schedule, and timelines. Both the contractor and the homeowner sign this document to formalize their agreement.
- Change Order: If any modifications to the original scope of work are needed after the project has begun, a change order is created. This document details the changes, including any adjustments in cost or timeline.
- Work Authorization: This form grants permission for the contractor to start work on the roofing project. It typically includes a description of the work to be done and may require the homeowner’s signature to proceed.
- Durable Power of Attorney: This legal document allows the principal to designate an agent to make important financial and legal decisions on their behalf, even in the event of incapacity. For more information, you can refer to NY Templates.
- Insurance Certificate: Contractors often provide proof of insurance through this document. It verifies that they have liability and workers' compensation coverage, protecting both the homeowner and the contractor in case of accidents or damages.
- Warranty Information: This document outlines the warranty terms for materials and workmanship. It specifies what is covered, the duration of coverage, and any conditions that may void the warranty.
- Final Inspection Report: After the roofing work is completed, a final inspection report is generated. This document confirms that the work meets all safety and quality standards and may be necessary for warranty claims or future inspections.
Having these documents in order can help ensure a smooth roofing project. Each serves to protect the interests of both the homeowner and the contractor, fostering clear communication and understanding throughout the process.